Saturday, April 20, 2013

The Candid Cook: Easy Guacamole

One of these days I'll start posting about my kids again, I swear!  
It seems like the last year we haven't been doing very much.
I'm working on changing that.

In the meantime... 


Want a little quesadilla with your guacamole?  
This is one of our (meaning me and the boys) favorite things.
We love love LOVE avocados.
You know that guacamole you get get out at restaurants?
This isn't it.
That's got too much extra stuff in it for their tastes.
The boys are purists.

So what DO we put in our green goodness?
(Warning: this makes a lot of guacamole, so if you are making it for one or two people, you probably want to half this.)

Anita's Easy Guacamole

2 avocados
1 Tbsp lime juice
3/4 tsp ground cumin
3/8 tsp Nature's Seasoning (salt blend)

I actually went through the trouble of measuring ingredients today, but remember you can make this to taste.  I usually just use the "sprinkle on till it looks right" approach.

To get started, scoop out the middle of the avocado and put it in a bowl.  If you don't know how to do it, there are some good tutorials online.  Here is one with a few suggestions if you need help finding one.
(Hey, look at that!  My counters really ARE avocado green...)


Next you take a fork and mash up the avocado, being sure to leave it chunky.


Next you add the lime juice, ground cumin, and Nature's Seasons.

Mix it well.

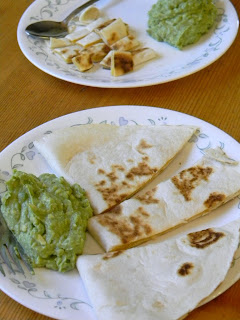
Eat it on a quesadilla.
 

Savor every bite.

If you are under three, you can get away with eating only the guacamole and leaving your quesadilla.

But you have to look cute and say "cheese" when mom points the camera at you.
 

 And be sure to wipe your plate clean with your finger.  There's no sense letting any of that go to waste.

So what do YOU like on your guacamole??

Tuesday, April 16, 2013

The Candid Cook: Potato Skin Soup (Loaded)

Confession: I was finally sucked into Pinterest by the promise of recipes.  It is fast becoming my giant recipe box floating in cyberspace. AND, it gives me an excuse to take the iPad from the kids while I'm making dinner because I need look up what I'm cooking on Pinterest.  Which leads me to last week when I needed to fix a meal on the fly.  But not just any meal.  A meal that could be both vegetarian for Olivia's friend who was over, and had some sort of meat to satisfy my manly-man husband.  Since I had a few strips of bacon in freezer left over from another meal, potatoes in the cupboard and, and sour cream in the fridge I started looking for a potato soup recipe.  If it has bacon in it, Ben will eat it.  If it has both bacon AND cheese in it, he will probably love it.  

I had to tweak the recipe a little since I wasn't going shopping before cooking and wanted to use the ingredients I had on hand.  I also needed to make it vegetarian except for the bacon part.  I loved my finished product so much that I wanted to save it - hence this blog post.  I don't want to "Pin" the other recipe - I want to pin MY recipe that I loved so much.  And to give credit where credit is due, here is the post with the original recipe that I doctored. And by the way, I also renamed it for the single item that I loved the most about the entire recipe: the crispy potato skin garnish.

Tater Skin Soup (Loaded)
(Serves about 4)

3 medium russet potatoes (about 1 1/2 lbs), peeled and chopped
   ***Be sure to keep the peels from 2 of those potatoes!!
2 Tbsp butter
1 small onion, finely chopped
2 garlic cloves, minced
1 Tablespoon all purpose flour
4 c. chicken broth or vegetable stock
1/4 tsp. mustard powder
1 cup sour cream
2 oz. Neufchatel cheese or cream cheese
1/2 cup shredded cheddar or blend
Salt/pepper to taste
3 slices bacon, cooked and crumbled

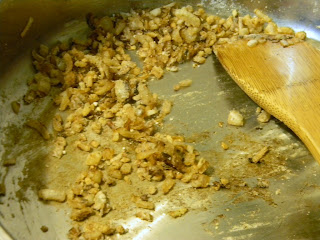
Peel your potatoes.  Reserve the skins from 2 of the potatoes, and chop into small bits.  Then, melt butter over medium in a large skillet with a lid.  Add the chopped potato skins and cook about 8 minutes until browned and crisp.  

Tip: Try not get impatient and turn up the heat to "high" to make the skins cook faster.  It'll scorch the butter and give you little black bits in the pan.  Just sayin'.

When the potato skins are done, remove from the pan and place on a paper towel to cool and absorb the excess butter. Pour out your scorched leftover butter, but do not wipe out the pan.  You'll need that little bit of grease to finish the job.

Add your onions to the pan and cook a few minutes till they are tender and starting to get translucent.  Then add your flour and mix together.  This is why you need the butter - to soak up the flour bits so you can make the soup base.

Slowly add the chicken or vegetable stock to your onion mixture and continue cooking over medium heat.

Add the diced potatoes to the broth and cook for about 8-10 minutes until the potatoes are tender. Put the lid on the skillet to help it cook faster, but be sure to leave it cracked and don't go far, or you might have a mess on your hands. If you chopped your spuds into larger chunks, this may take a little longer.

While I waited for this step, I started crisping the bacon on the other burner.  See how efficient I am?

Try not to snack on the crispy tater skins while you're waiting.  You'll want those for your soup.

When the potatoes are tender enough, take about 1/2 of the mixture and puree it in a blender.  You can see here that I have left a bunch of potato chunks and broth in the pan.  That's because Ben won't eat soup unless he can chew it.  I think it's a man thing.

Then, in a separate bowl, mix together your sour cream and cream cheese.

Add about 1 cup of the pureed soup and combine.

Finally, dump the puree and sour cream mixture into the skillet, add the shredded cheese, and stir it all up together. You are almost ready to eat.  Which is good because I know you're probably starving by now.

To serve, ladle soup into a bowl and garnish with the crispy potato skins, crumbled bacon, and an extra pinch of cheese.

Eat it up, and try not to moan with delight.  It annoys the children.

Yep, it's that good.
My Kids Are Hilarious

It's possible that I'm suffering sleep deprivation.  Actually, it's more than possible.  It's probable.  But it's equally probable that my kids are just really funny these days.  I realize that I have posted funnies from Kelsey and Connor lately; now it's Olivia's turn.

Image from here
Today we were driving down the road behind a Thunderbird convertible that looked much like the one pictured above.  Olivia's dialogue went something like this:

That's a nice-looking car.  It's be cool to have a convertible.

It's kind of a funny shape, though.

Kind of like a fat hot dog.

Seriously! If you just take off the windshield and tires, paint it the color of a hot dog, and imagine it in a bun - a FAT bun. A hot dog, right?

(And then a couple minutes later when the car turned into the 7 Eleven...)

That car totally has to fill up on ketchup for gas.


I'd like to say the kids get their sense of humor from me, but I don't really think they are trying to be funny.  Their comments actually remind me a little of comments that their Aunt Dorothy used to make when she was younger.  For example, here's one of our family stories that gets passed around:

Image found here

Years ago we were visiting upstate NY and Dorothy was riding with a family friend (Jim Maher) to go pick up some pizza.  This was about the time the farmers started making those giant round bales in their hay fields instead of the smaller rectangular ones.  Jim turned to Dorothy and said, "You know, the cows have been complaining."

"Why?" Dorothy queried.

"They've changed the bales of hay, and now they aren't getting a square meal every day," was the answer.

Dorothy thought for a minute, and then replied, "Well, they are getting a well-rounded one."

Sunday, April 14, 2013

The Candid Cook: Cinnamon Balls (aka "Nummies")

I'm sure this recipe has been done somewhere before by someone.  But not only is this delicious and easy to make for you non-Martha-Stewart types, it's something you can prepare the night before and bake in the morning.  And when church is at 9am and you have to make a special family sit-down breakfast before you go on Easter Sunday... this is just what you need.


The night before you want to eat these, take out about a dozen frozen Rhodes Rolls and let them thaw about an hour.  Once they are soft enough, cut each roll in half with a pair of scissors.  Clean scissors, please.  You are going to eat these after all.

Next you have one bowl with melted butter and cinnamon sugar in a second bowl.  Coat those little babies with butter and cinnamon sugar, and then place into a glass baking dish sprayed with non-stick spray.

Cover the dish with plastic wrap and place it in the fridge.

When you get up in the morning, the rolls will look something like this:

Bake at 350 degrees (preheat your oven, of course!) for about 20-25 minutes.  I can't be sure how long you'll need to exactly because my oven is doing crazy things at the moment. It's all a guessing game when I bake stuff these days.  But when they are done they'll be a nice golden brown.

You can enjoy them just like this, or - if you have the inclination - you can drizzle with powdered sugar icing.  (Which, if you don't know, is just a mixture of powdered sugar and milk that thinner than regular frosting and will melt nicely on top of hot rolls.)

The Candid Cook: Grilled Asparagus and Mushrooms

Recently my sis-in-law told me about the joys of grilled asparagus.  I'm not sure if this is how she did it, but I've got to add my adulation as well.  This is amazing!!  It's nice and crisp tender, and the best part is you don't heat up the house to make it - just like all grilling recipes.

If you've never bought the bundled asparagus in the store before, you are really missing out.  One simple trip to prepping it when you get it, is that rather than cutting off the tougher bottom end of the stem, you snap it off.  If you can't snap it easily, then move a little closer to the top and try again.  This makes sure that the more fibrous - and less delicious - portion doesn't end up on your plate.

 Once you have your asparagus clean and trim, place it on a large sheet of aluminium foil.  If you don't have heavy-duty foil, be sure to use a double layer to protect your veggies from burning.

Then top with about 4 oz. of sliced fresh mushrooms.  These were the small portabella mushrooms that I had left over from another recipe.  Drizzle with olive oil or melted butter, then sprinkle with your preferred seasoning blend.  Personally, I like Morton's Nature's Seasons for almost everything.

Grill until the mushrooms start to release their own juices.  It should be tender enough by then and ready to eat.  Delicious!

Kids Say...

The other day Connor and I were snuggling on the couch.  He looked up at me thoughtfully, then said in all seriousness, "Mom, why do you have spiderwebs up your nose?"

Wednesday, April 10, 2013

The Benefits of Being 9

Kelsey: I can't believe I'm 9 now.

Me: How does it feel to be nine?  Do you feel different?

Kelsey: Yes, I feel taller.